Creating your first Necromunda gang list using Gyrinx
Getting to grips with the basics
In this tutorial, we’re going to learn about one of Gyrinx’s core features: building a Necromunda gang list that you can then use for a skirmish, or take into a campaign.
We’ll do this by creating an single-fighter Orlock gang list using the rules from House of Iron, but you’ll find the steps are similar — with small changes — for all the other gangs. By the end of the lesson, we’ll have a battle-ready fighter, which is the foundation of list-building.
If you’re looking for specific tips for other gangs, or want to learn how to handle things like Corrupted or Crusading gangs, check out our List Tips & Tricks page.
Let’s get started.
One important point
If you’ve built a gang using YakTribe, you’ll know it’s a credit-based system: you start with (for example) 1,000 credits, and they are whittled down every time you buy something.
We think this is unnecessarily fiddly, especially when you decide to delete a fighter and have to refund yourself for their cred cost.
So instead, Gyrinx list creation is all about building up — rather spending a pile of credits, in our system you just add stuff to your gang (or take it off) until you’re at the appropriate gang value. This removes the mental arithmetic and self-refunds, and lets you focus on putting a list together.
Then, when the list is ready, put it in a campaign. At that point, it becomes a campaign gang and is subject to conventional credit rules.
Creating a new gang
We’ll start by making the gang itself. To do so, head to the Home or Lists pages, and hit Create a new list or the + New List button. If you can’t see those, make sure you’ve signed in.
After clicking those buttons, you’ll see the Create a New List page.
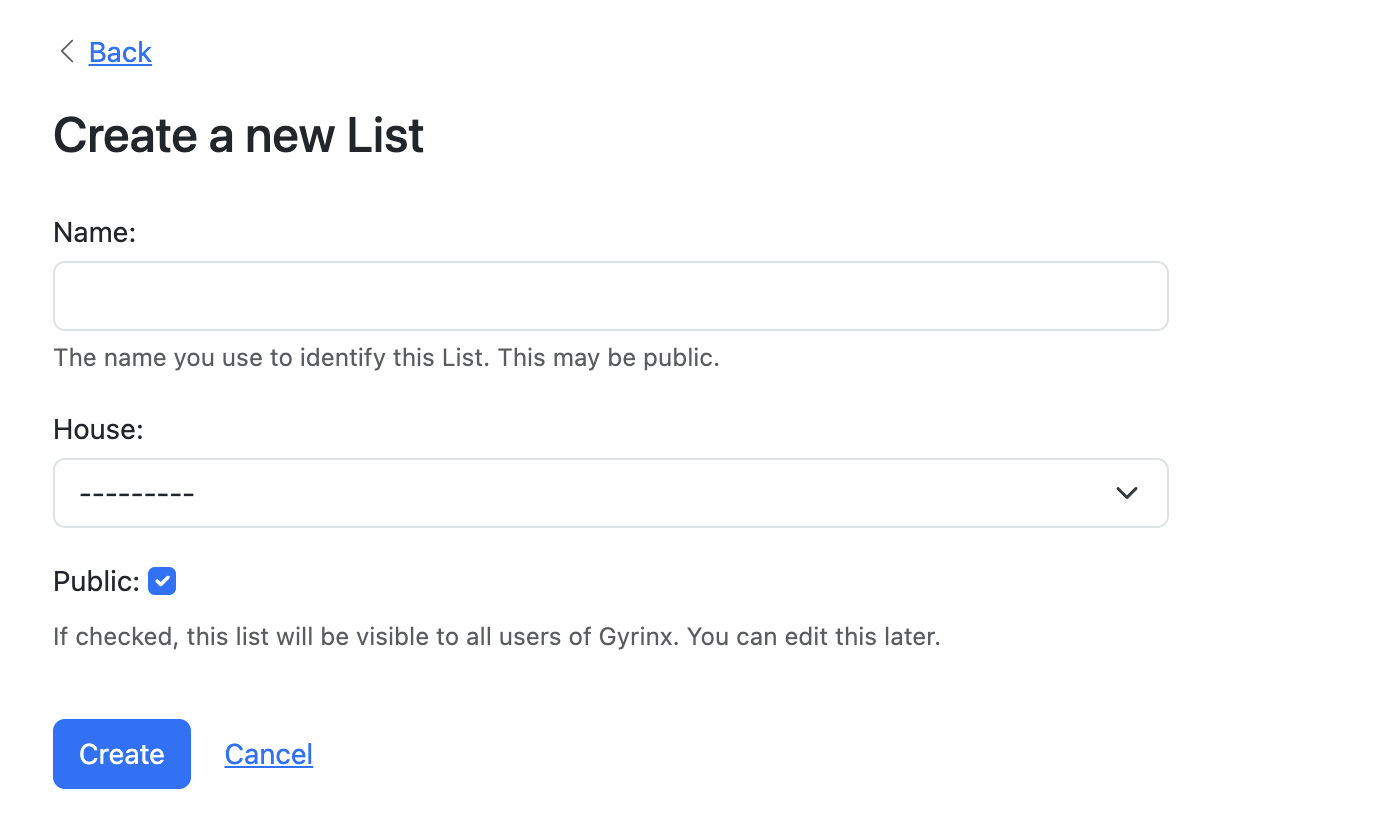
First up, select Orlock (HoI) from the House drop-down to set your gang type.
Then, choose a name by entering it in the Name field. We’re going to call our dummy gang the “Sump City Stompers”. Don’t worry too much the name — you can always change it later.

When you’re happy, check or uncheck the Public option, depending on whether you want the gang to be visible to other users at this stage, then hit Create.
We’re then taken to the List page, which offers an overview of the gang.
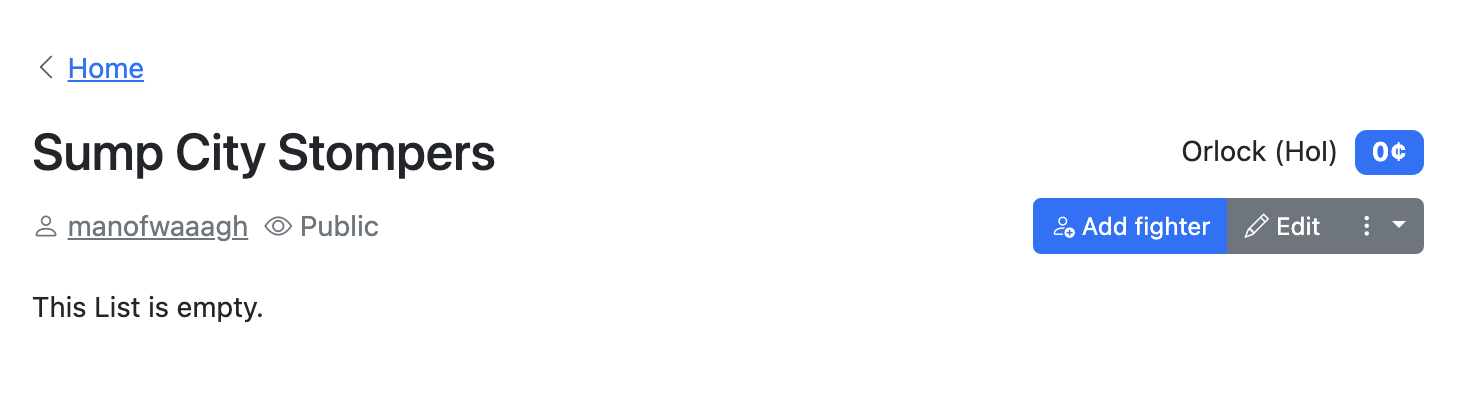
It’s obviously a bit empty at the moment, but we’ll quickly fix that by adding some fighters.
Adding fighters
Let’s add a fighter to the gang. Since they’re the most important, we’ll make a leader, which for Orlocks is called a Road Captain.
To add a Road Captain, we click Add Fighter, which takes us to the Add A Fighter a screen. You’ll notice this looks pretty similar to the list-creation page we saw earlier.
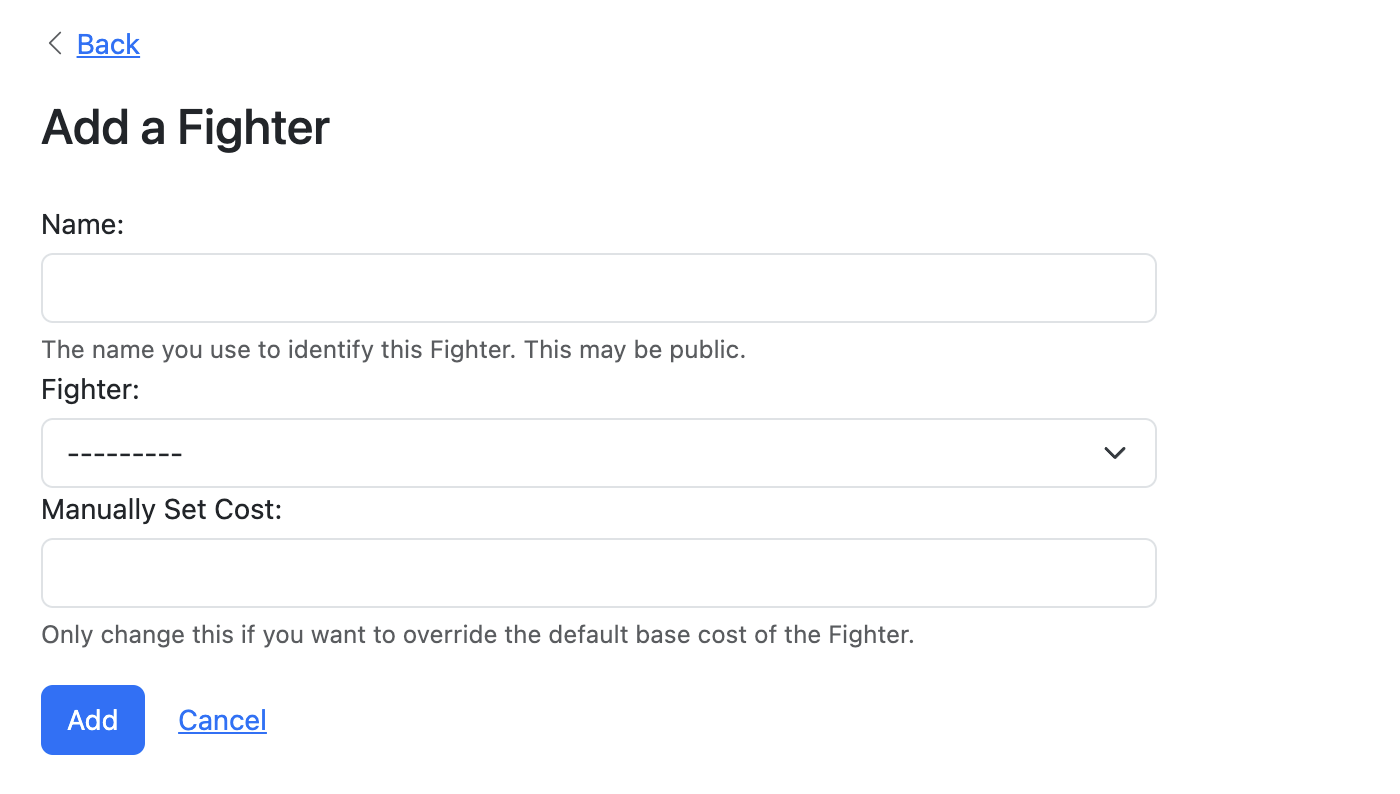
List with the list creation screen, we’re going to start out by selecting the fighter type we want from the Fighter drop down. So in this case, we scroll to the Orlock (HoI) section and select Road Captain. Once that’s done, we need to name our leader. Let’s call him “Big Tim”, by entering that in the Name field. Again, you can change this later.
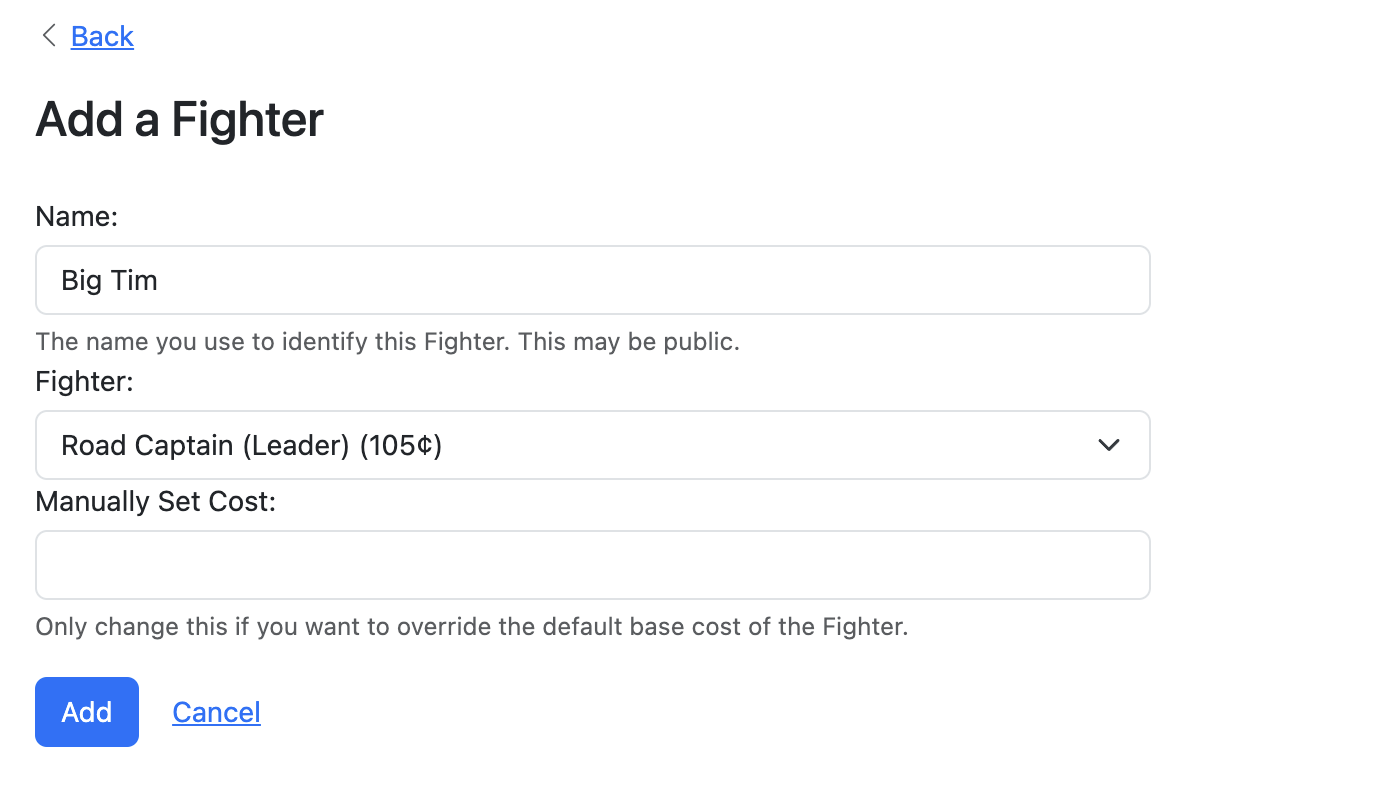
If needed, you can use the Manually Set Cost field to override Big Tim’s base cost, but we don’t need to do that here. Let’s hit Add.
We’re taken back to the List page, but now there’s a Fighter Card created for Big Tim, showing his name, cost, stats and other rules.
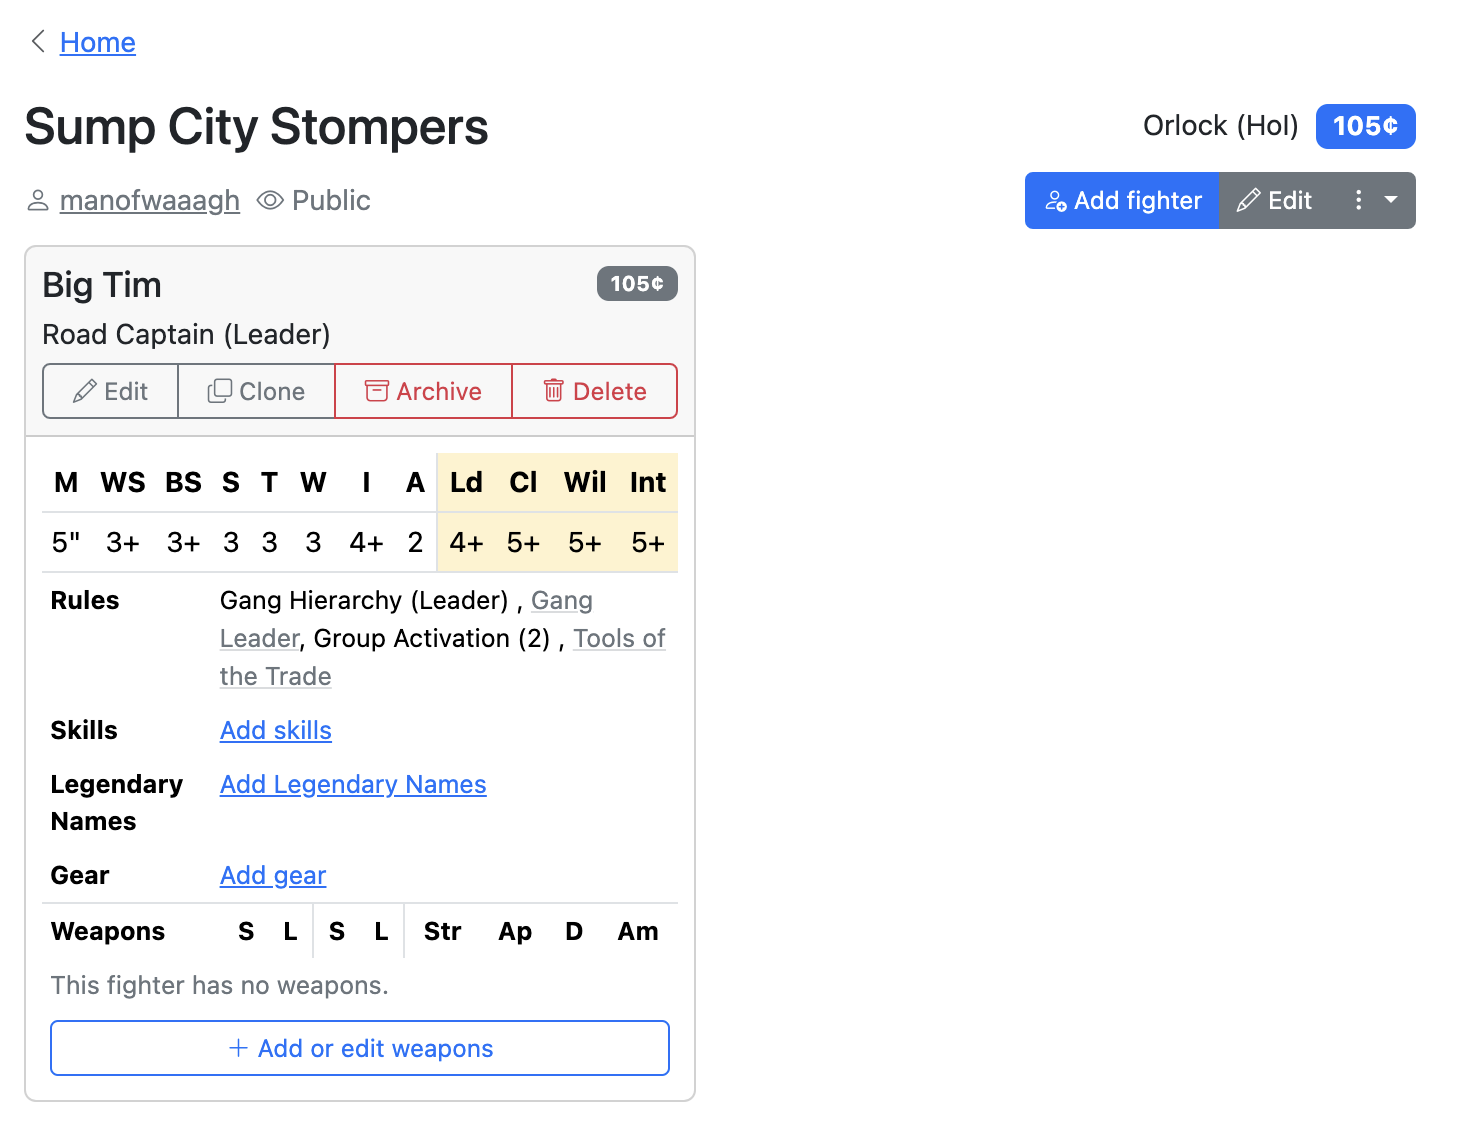
If we look to the top-right of the list page, we can see that adding Big Tim has also given our gang a Rating of 105. When creating gangs on Gyrinx, we don’t spend credits — we just add and take away things until we hit our target rating.
Big Tim’s in place, but he doesn’t look very scary yet. Let’s give him some Weapons and Gear.
Equipping a fighter
To add a Weapon, we hit the Add or edit weapons button at the bottom of his card. That takes us to the Weapons page for Big Tim, which by default shows all the weapons on his fighter equipment list in House of Iron:

We can scroll down to see all the weapon options available, including their various profiles and traits. Using the Search box and the Category dropdown, we can also filter further. Let’s say we want Big Tim to have an power knife. We can scroll or filter, but let’s use the search box, by typing in “power” and hitting Search. We can now see all the options available to Big Tim by standard with “power” in their name:

We’ll add the power knife by hitting + Add Power knife. The page will refresh, and you’ll see a power knife has appeared on Big Tim’s fighter card. His rating will have also increased by 25 as a result of carrying the knife.

Big Tim’s now ready(ish) to fight, but let’s give him some armour to protect him from Underhive nasties. To do so, let’s click Add gear, which will take us to Big Tim’s gear page.
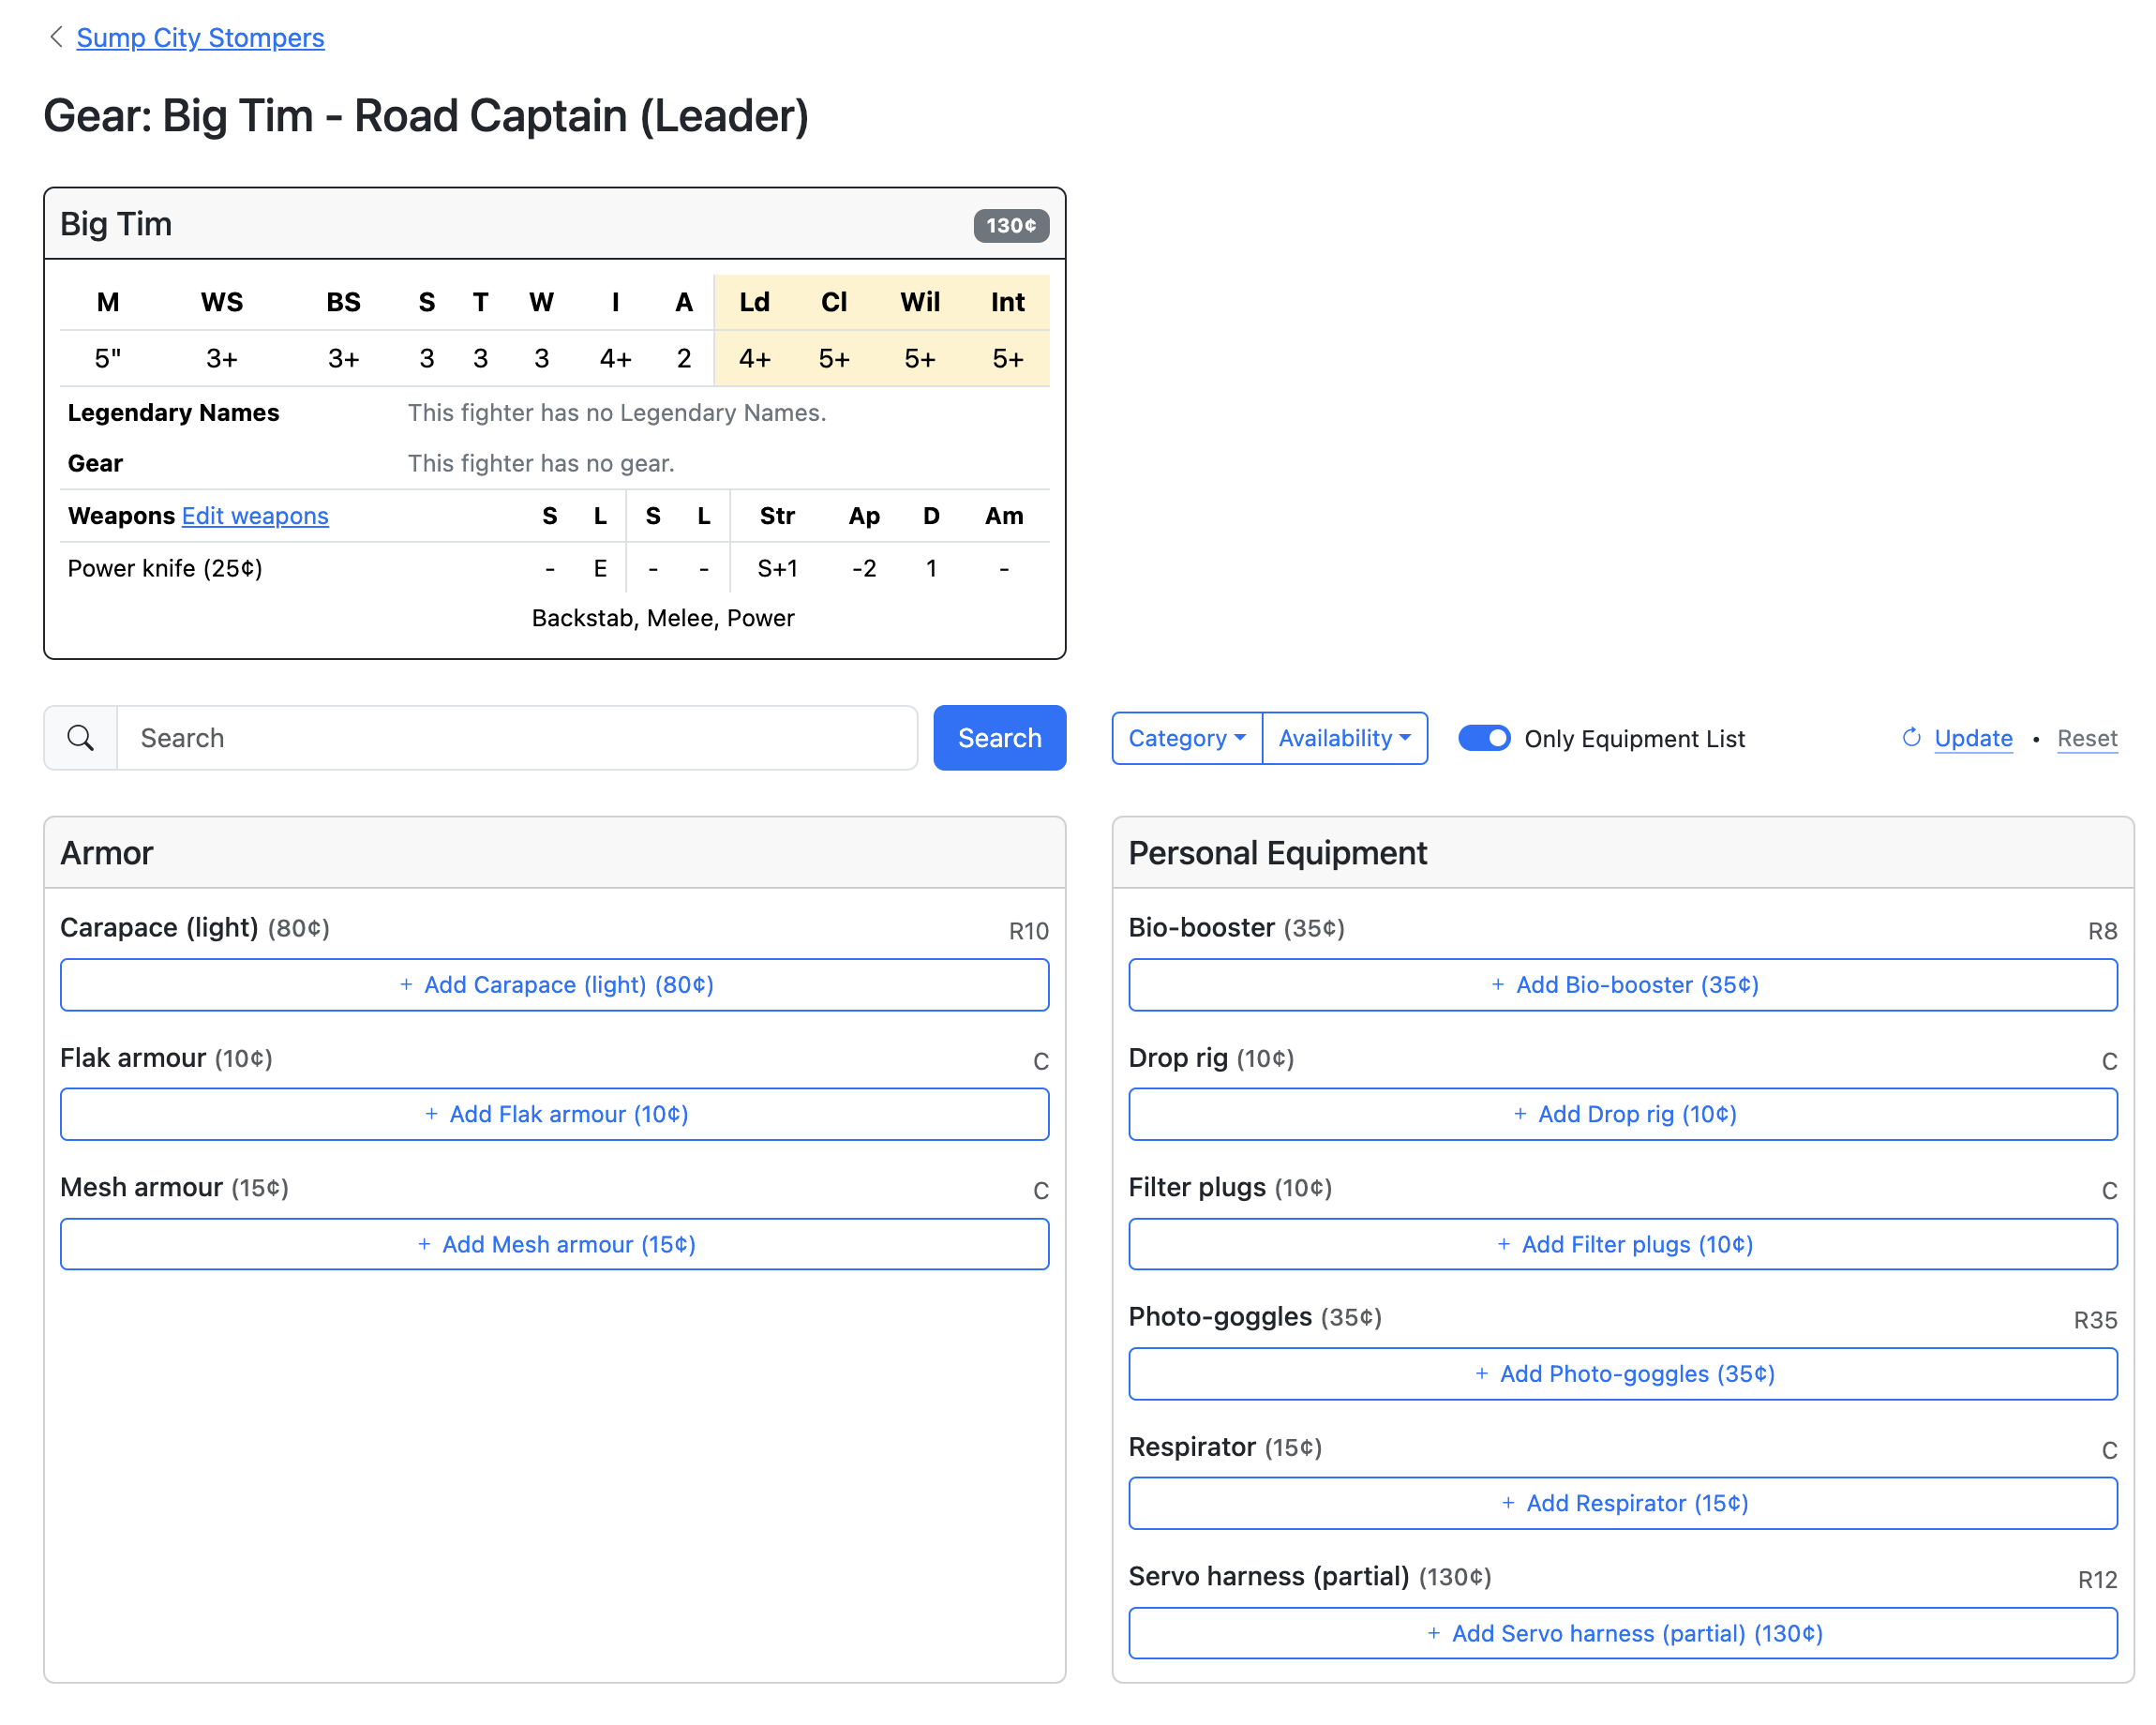
To buy Big Tim some mesh armour, we click + Add Mesh armour. His card will refresh to show the mesh armour has been added, and his rating will update accordingly. Nice! Let’s go back to the list page to see how things look overall, by clicking < Sump City Stompers above his card.
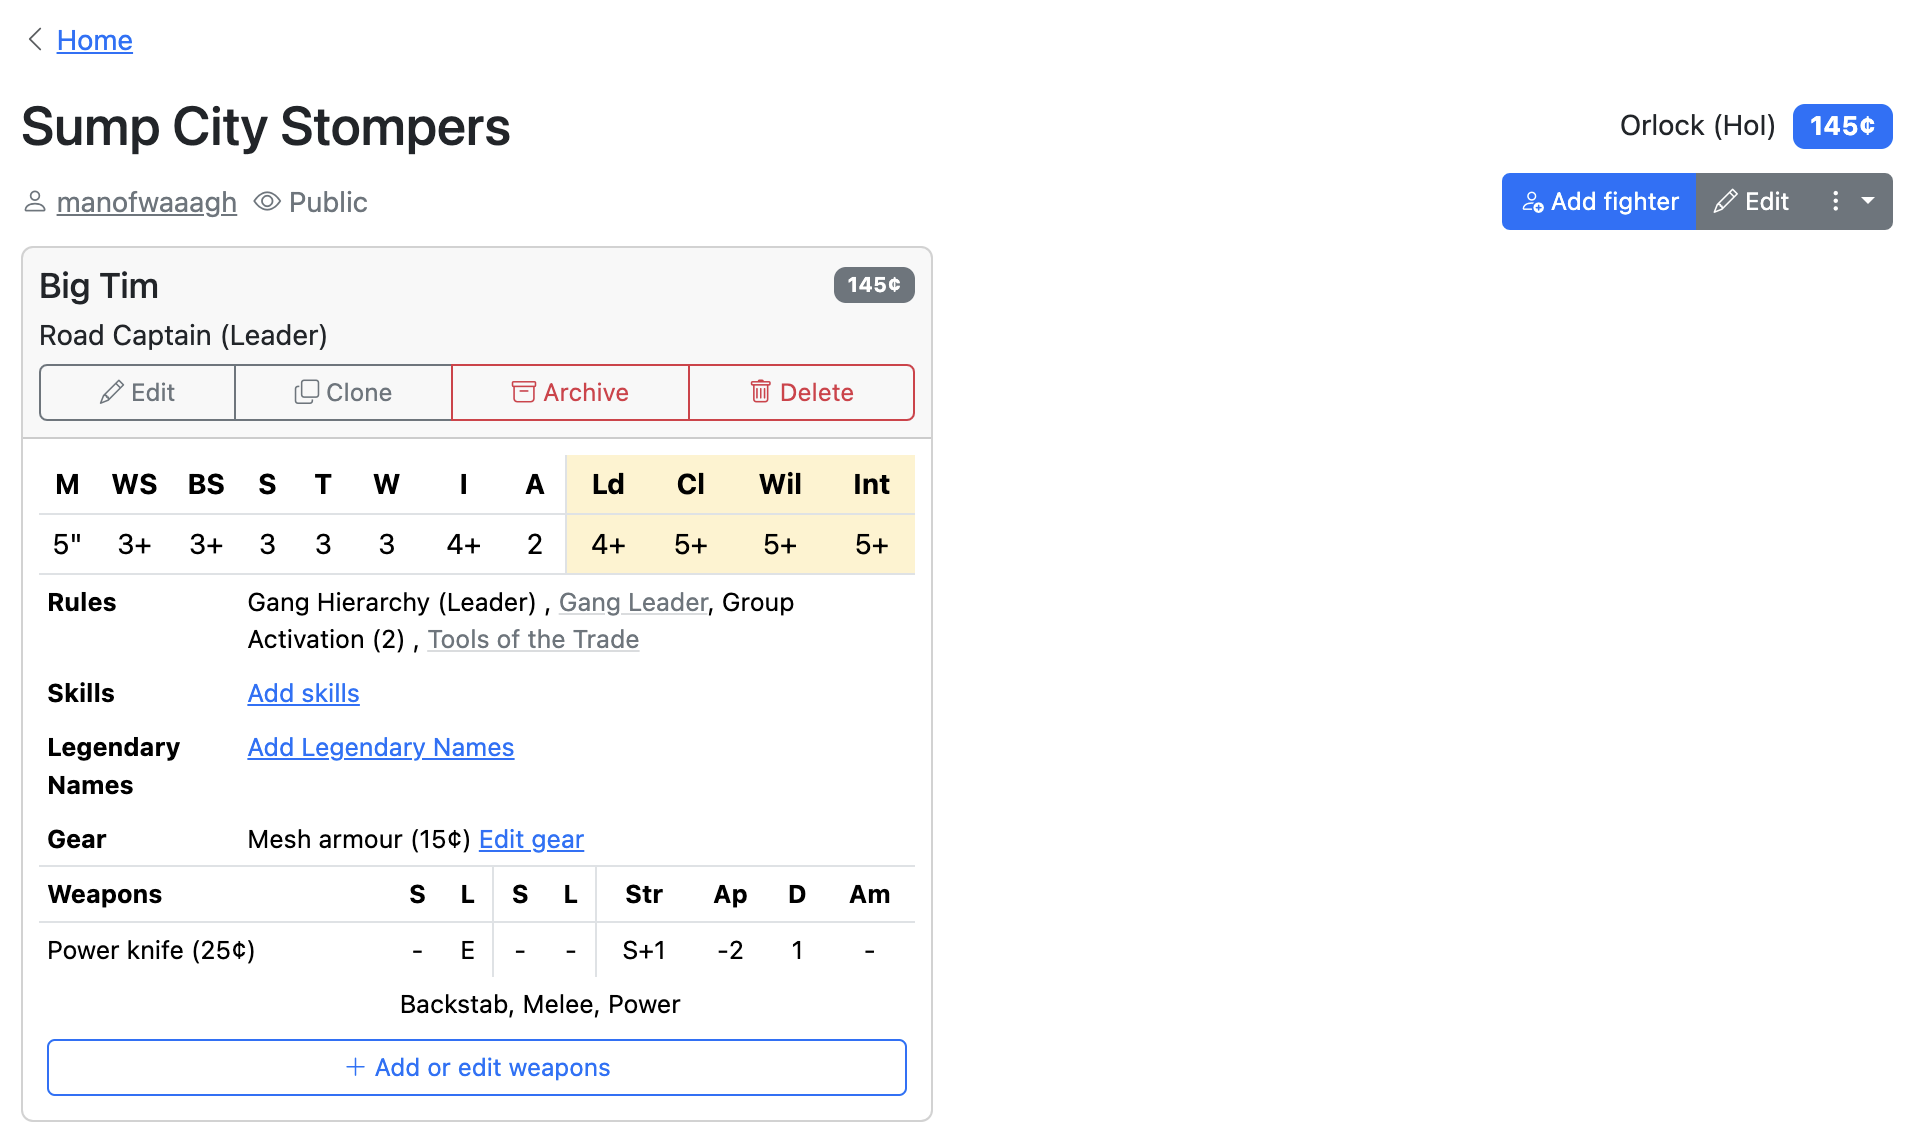
Back on the list page, we can see Big Tim’s card with everything we’ve added, and that the gang’s overall rating has changed a result of adding him.
Before we add some more gang members, let’s sort Big Tim’s Skills and Legendary Name — he gets one of each at gang foundation under the standard rules.
Hit Hit skills to get to his skills page.
On the Skills page, the table at the top will show which skillsets are available to a Road Captain by default:
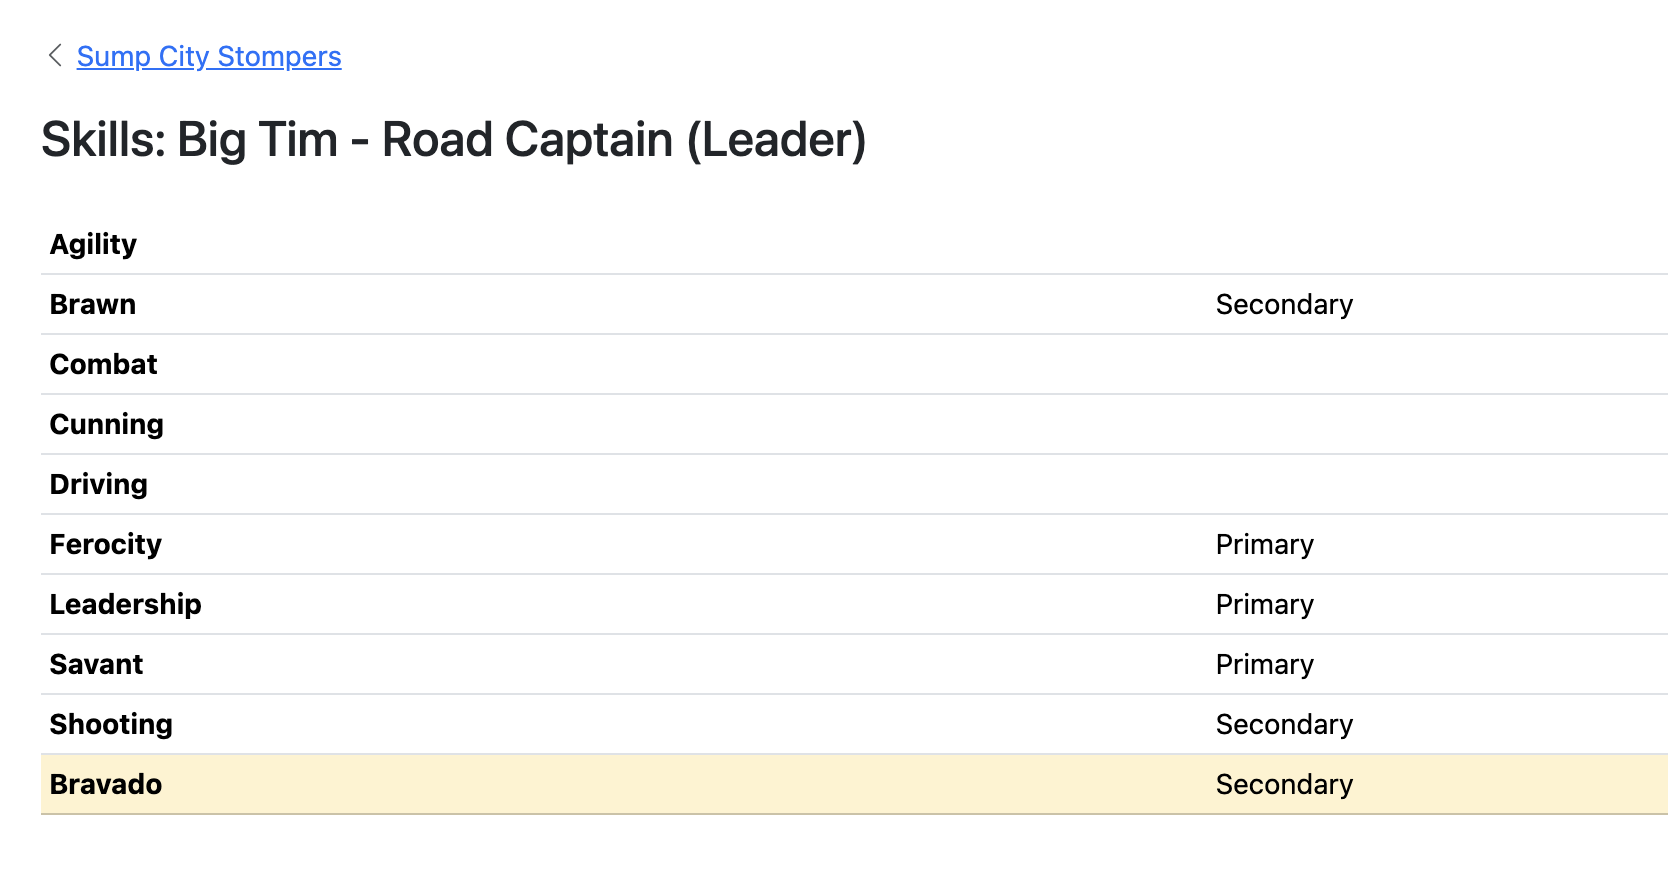
We can then scroll down, and pick the skill we want from the relevant set. Let’s try Mentor, from Leadership, by checking the box next to it and then hitting save.
Gyrinx will then take us page to the List view, with Mentor now on Big Tim’s card.
Hit Add Legendary Names to access the Legendary Names view. This looks slightly different to Skills, but works roughly the same: select the name you want — we’ll do Iron Stare, which is in Impressive Leadership. We check the box next to Iron Stare, then hit + Add Impressive Leadership to add it to Big Tim’s profile.
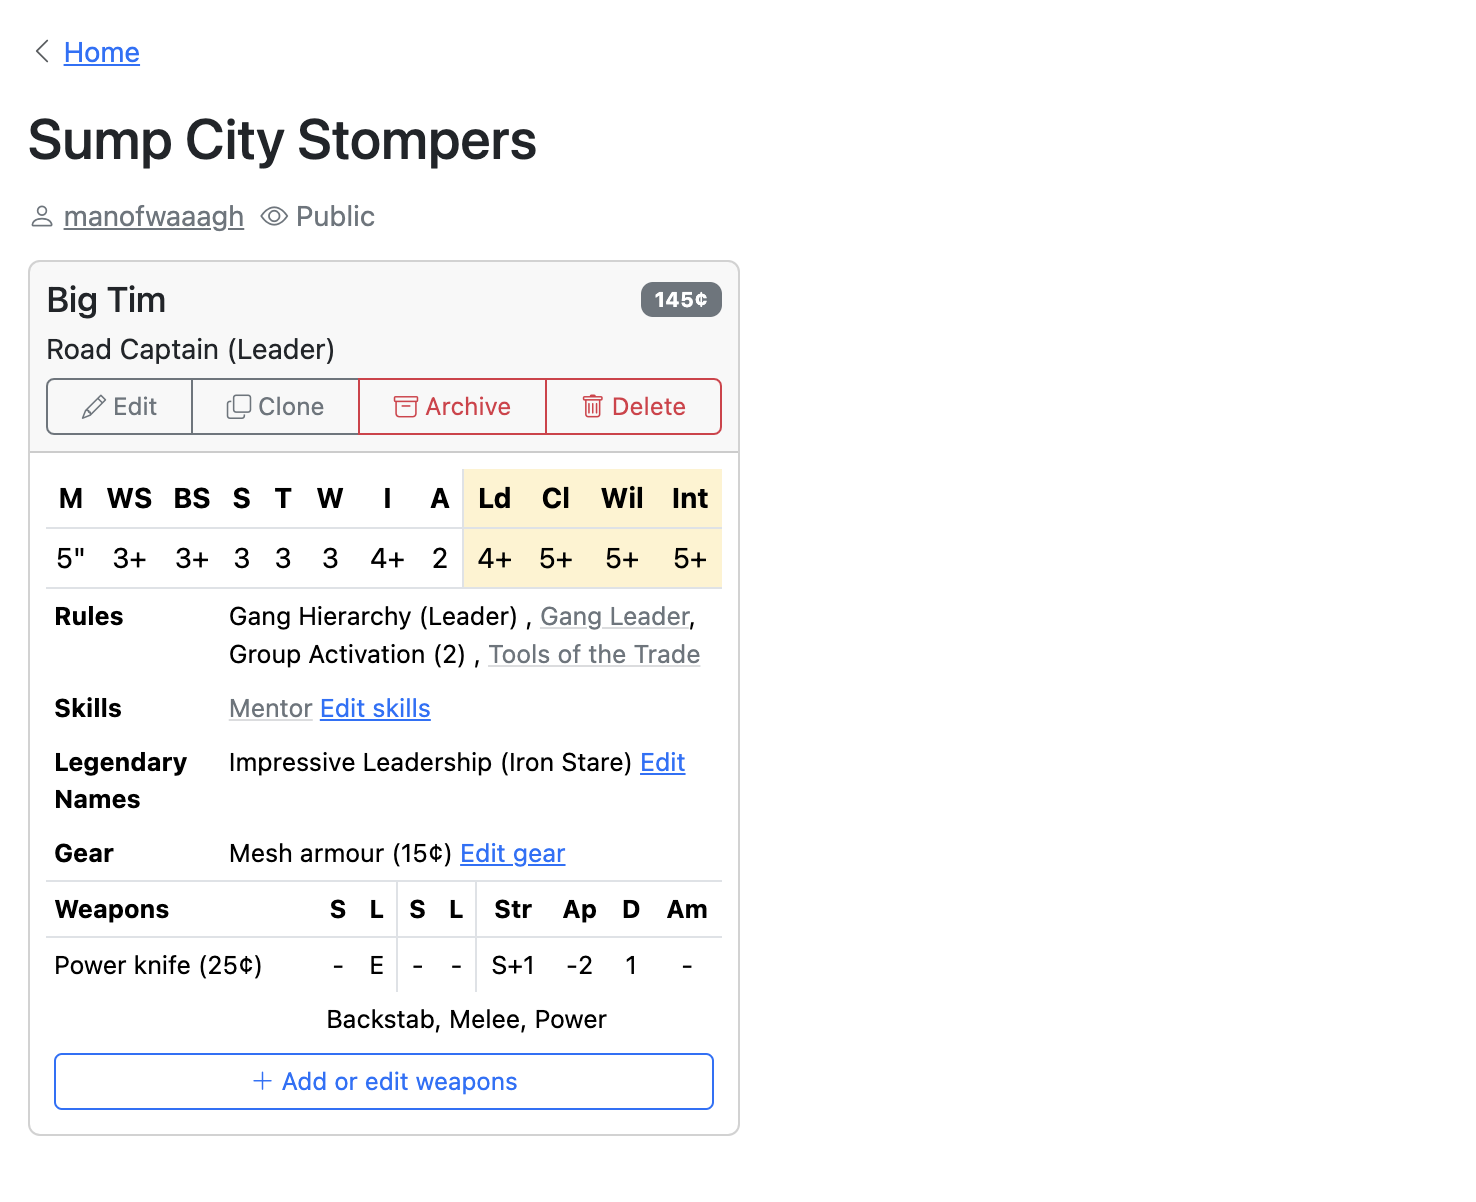
Here’s how Tim’s profile now looks:
That’s the basics of adding a fighter to your list — you can follow these steps for further fighters until your whole gang is ready. Why not create a Road Sergeant and see if you can follow the steps above with a different loadout?
One important thing to note (especially if you’re playing a horde gang) is the Clone button. As it suggests, this will duplicate the fighter, allowing you to quickly create variations on the same fighter type. Once a clone has been created, you can change their name and loadout as usual.